V and I had been planning on putting our keggerator together for years and picked up one of the Danby fridges from Costco a while ago. Due to lack of tools and desire to actually do anything, the project languished for a really long time. After moving into our new place and losing access to our bottling crew it was time to get this thing going. We decided on doing a dual tap system, and ordered a kit from Ontario Beer Kegs during their Black Friday sale.
Something we wanted to avoid was getting our hands on all the tools we’d need to complete the project. Thankfully the city of Hamilton has a tool library with a massive collection of hand and power tools. We were new to the area and coordinating with some people on our home-brew list was a bit tricky, so the membership fee definitely made it worth the reliability/convenience. Most of the setup was based on some instructions we found on the Homebrewtalk forums regarding our exact model. I’m not entirely sure what we are doing wrong, but we found it impossible to fit two 20L corny kegs in the fridge; however, we weren’t going to let this stop us from making the most of it.
Looking through the thread I saw that someone had made a really nice improvement upon the build — they added a manifold to the fridge which freed up a bunch of space inside the fridge. The one problem I had with this setup was they were using barbs to attach their hoses. I wanted my hosing setup to be a bit more flexible and impermanent. I knew that I wanted to use threaded connectors similar to what one would attach keg connectors to. I came across the exact piece I’d need from my newly acquired Beer Gun, a 1/4” MPT to Flare connector. With this in hand I headed off to Home Depot to figure out what my build was going to be.
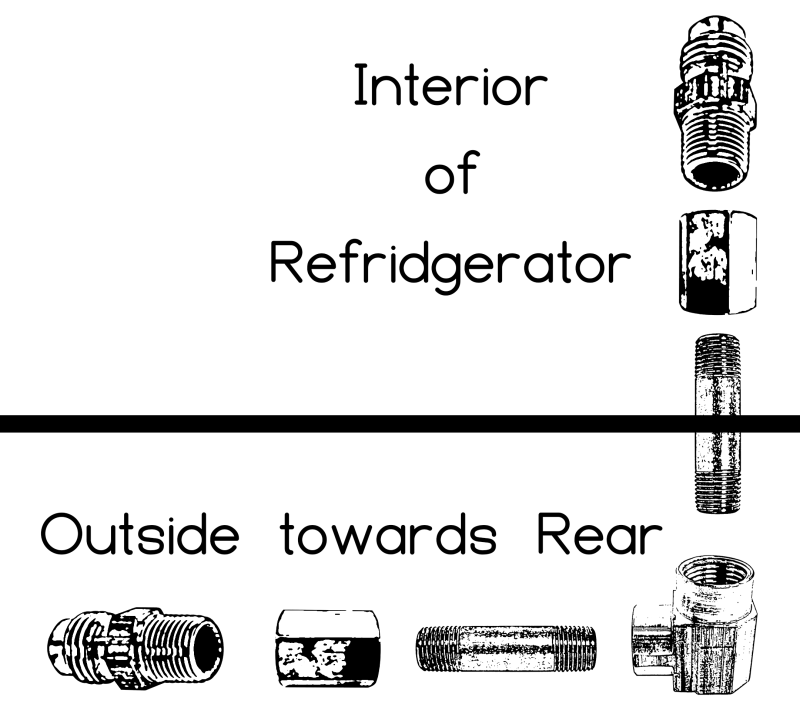
The components I grabbed to do my build were:
- 2 x 1/4″ Flare to 1/4″ MIP Union
- 2 x 1/4″ FIP Pipe Coupling
- 2 x 1/4″ MIP x 2″ Brass Nipple
- 1 x 1/4″ Female Pipe Elbow
- 1 x Steel or Rubber washer that has a 1/2” hole. I’m not sure, I just tested things until I found one that worked
- Teflon Tape
Using the washer, and looking at the image on the forum thread I marked where I’d drill my hole using a permanent marker. I only had a 3/8” drill bit, and it was a tad too small for making the correct size hole. I believe the right size would’ve been 1/2”, though to make up for it I simply used the drill bit to slowly grind off the edges until the nipple would fit through.
Assembly of CO2 manifold to attach to fridge
With the hole I then began assembling the manifold. The big thing to keep in mind when putting it together is that everything needs to be air-tight otherwise you’ll burn through your CO2 tanks in no time. In the past I’d had CO2 tank issues so I’d flip-flopped between kegging and bottling simply out of frustration.

External Connection that leads to the CO2 Tank
Verifying and correcting air leaks will be the most time consuming part of the build. For myself I had a spray bottle of StarSan that I’d spray all the contact points then turn on the gas. After everything was air tight, the build was basically done. We had previously installed the tower so all I had to do there was re-install it.
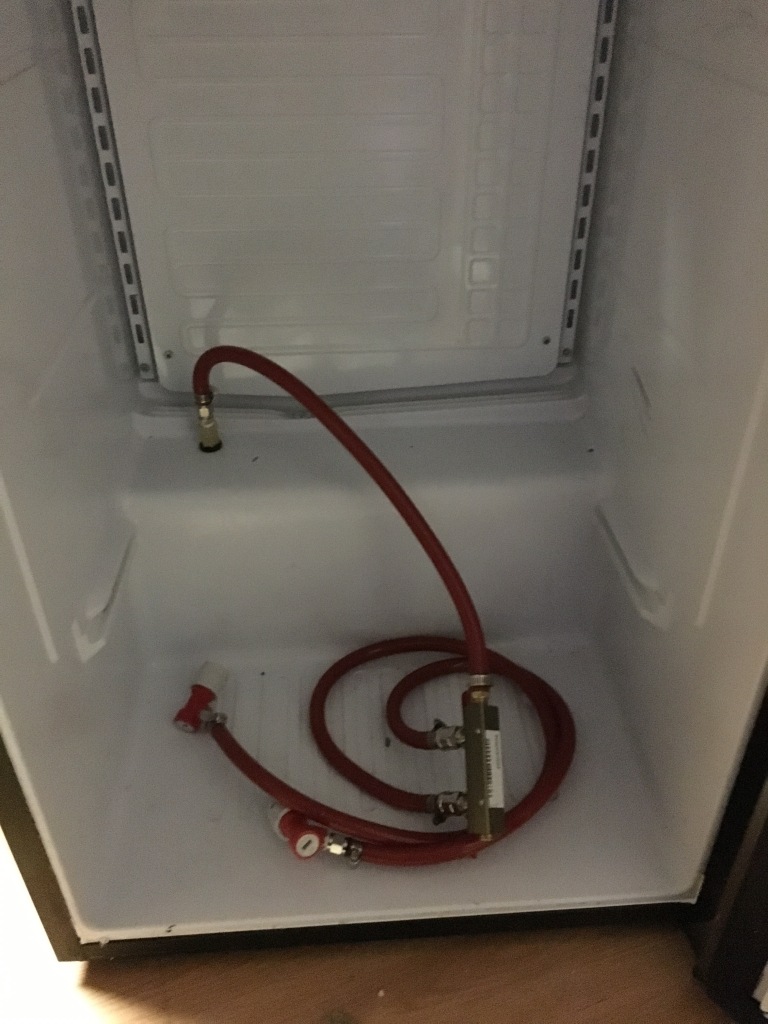
Interior of fridge connected to a 2-hose manifold
So where’s this 0.5 of a keg? I got my hands on two half-sized kegs and can fit it inside the fridge on the little shelf where the compressor is. The issue lies with providing an extended ledge that allows the keg to sit flat on this ledge. For that I grabbed an 8’ 2×6 and made five 6” squares from it and glued them together. This is pretty hacky looking and not everything is exactly 6” by 6” but it does a good enough job. Another issue is that 5 blocks is too short, and 6 is too tall. I have yet to fix this, but plan on using some scrap plywood or something to add the tiny amount of height I need to get everything balanced. For now I’m just using some folded paper bags that are fairly stable and keeps the keg stable.

Blurry / Terribly artifacted picture of dual-keg setup (with load bearing temporary box)
With everything installed all that’s left to do is throw in some kegs. I’m really happy with this build, and while I am still limited to a single PSI on both of my kegs, this is definitely a step up from what I was using before. I hope this helps out anyone who has been thinking of doing their own build and please let me know if there’s anything else you’d like to know about it!

Nice build! Can you provide item / part numbers from Home Depot or possibly links to the website?
LikeLike
The links in the list of parts should work and take you right to the each part on the Home Depot website.
Are you getting a 404 when you try going to those pages?
Edit: My theme does weird styles to links in lists. I added some custom styling to make it a bit more obvious.
LikeLike
thanks! I totally missed that!
LikeLike